Tuesday, March 1, 2016

Full-Featured Email Marketing System – Made Easy

Full-Featured Email Marketing System – Made Easy

Operion MailBlast is the easiest email marketing platform, designed to increase email marketing ROI faster than any other medium for small businesses and enterprise customers. For 9 years, we have been serving over500+ customers from Malaysia, Singapore, Hong Kong, New Zealand, Australia, delivering 100,000 emails every month with an average deliverability rate of 99.5%.

Designed to deliver best results:

· Email campaigns made easy.
Create and send newsletters in minutes
· Best-in-class deliverability.
Your campaign reaches 99.5% of target inboxes.

500+ Companies Trust Operion MailBlast

From one-person companies to large organizations, every business can increase sales and strengthen customer loyalty with Operion MailBlast, the easiest email marketing platform. 


Operion MailBlast 99.5% Email Deliverability

Operion MailBlast is committed to maximizing your email deliverability.

Since 2007 Operion MailBlast has nurtured close relationship with all major ISPs. Our deliverability experts work around the clock to ensure successful deliveries. 

We will launch the new version on 1st April 2016 (April Fool Day).

Stay tune with the Operion MailBlast email marketing system rate at this link http://www.operion.com.my/email-marketing.html 

Wednesday, February 24, 2016

IMAP Mail Client Setting

IMAP Mail Client Setting

1. Open Outlook, select tab File > Add Account


2. Select POP or IMAP and click on Next


3. Check the option Manual setup or additional server types > Next


4. Fill out Your Name, Email Address, select Account Type - IMAP

Enter/select the following information: 
Your Name: the name of your account in Outlook 
E-mail Address: your Email email address 

User Name: your full email address 
Password: the password for this email account 
Require logon using Secure Password Authentication (SPA): should be unchecked 
Account Type: select POP3 from the drop-down menu 


(Option A):
Incoming mail server :mail.domainname.com 
Outgoing email server :mail.domainname.com 

(Option B):
Incoming mail server :host25.registrar-servers.com 
Outgoing email server :host25.registrar-servers.com 

5.Once done, click on More Settings in the lower right corner of the window.


In the tab Outgoing Server checkmark the option My outgoing server (SMTP) requires authentication > Use same settings as my incoming mail server

6. In the tab Advanced configure port settings as follows: 

 IMAP: port 993, SSL or port 143, TLS 
 SMTP: port 465, SSL or port 25 (26), TLS 


7. Once all is done, click OK to close the window and then Next to test server connection


POP3 Mail Client Setting

POP3 Mail Client Setting

1. Open Outlook, select tab File > Add Account


2. Select POP or IMAP and click on Next


3. Check the option Manual setup or additional server types > Next


4. Fill out Your Name, Email Address, select Account Type - POP3. 


Enter/select the following information: 
Your Name: the name of your account in Outlook 
E-mail Address: your Email email address 

User Name: your full email address 
Password: the password for this email account 
Require logon using Secure Password Authentication (SPA): should be unchecked 
Account Type: select POP3 from the drop-down menu 

(Option A):
Incoming mail server:mail.domainname.com 
Outgoing email server: mail.domainname.com 

(Option B):
Incoming mail server:host25.registrar-servers.com 
Outgoing email server:host25.registrar-servers.com 

 5. Once done, click on More Settings in the lower right corner of the window.


  In the tab Outgoing Server checkmark the option My outgoing server (SMTP) requires authentication > Use same settings as my incoming mail server

6. In the tab Advanced configure port settings as follows: 

Incoming server (POP3): 995 port for SSL,110 for TLS 
Outgoing server (SMTP): 465 port for SSL,26/587 port for TLS 


7. Once all is done, click OK to close the window and then Next to test server connection


Tuesday, October 20, 2015

Setting up Gmail for POP3 and SMTP

Setting up Gmail for POP3 and SMTP


You can use your Gmail account to send and receive your domain email address by setting up your domains email address as a POP3 and SMTP account at Gmail. This article will explain how to set up Gmail to use your domain email address.

Note! If you previously had a forwarder to your Gmail, you will need to remove that after your Gmail is set up.
Also! We recommend using the SSL settings. The SSL email setup is more secure as it encrypts the data while in transit.

Steps 1
Log into your Gmail account.

Steps 2
Settings POP3 SMTP Gmail Go to the Gear at the top right and select Settings.


Steps 3
Click the Accounts tab.


Steps 4
Next to "Check mail from other accounts (using POP3)," click Add a POP3 mail account you own.


Steps 5
Enter your domain's email address and click Next Step.


Steps 6
Enter your POP3 information for your domains email address in the form.Click Add Account.


Steps 7
You will see a message stating Your mail account has been added. You can set the email to send as well.

Note! If you do not want to send through Gmail, click the No radio button. You don't need to follow the next steps.

If you want to send through Gmail, select Yes and Click Next Step.

Steps 8
Enter your Name.Click Next Step.


Steps 9
On the Send mail through your SMTP server page, fill in your SMTP Server, Username (full email address), and Email Password. Then, click Add Account.


Steps 10
Now, Gmail will email a verification code to the address you just added. Check your domains email for a message Gmail sent you. Click the link in the email, or Enter the code into the text box and click Verify.


Now you will see your Domains email address in the Send Email As and the Check mail from other accounts section.


Friday, June 12, 2015

How to setup email on Android

How to setup email on Android


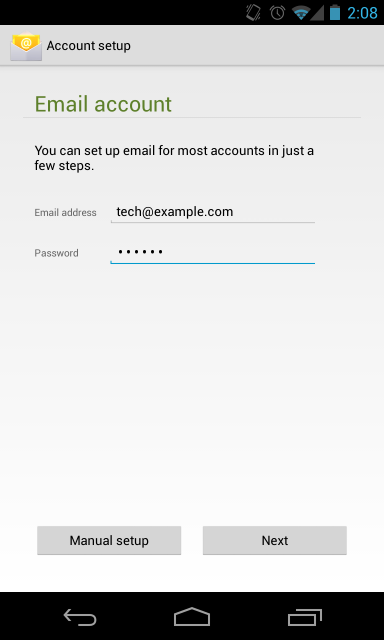
1. Open your email client.
2. Enter your full email address and password.


3. For the Account type, select POP3.


4. For the Incoming settings, we recommend using your access domain for the incoming server. You will also want to leave the Security Type as None. See Figure 3 as an example.


5. For the Outgoing settings, we also recommend using your access domain for the SMTP server.


6. Configure your Account options as desired on the subsequent screens and you're done!

How to setup email on iPhone

How to setup email on iPhone


1. In your iPhone, go to Settings-> Mail, Contacts, Calendars and go to Add Account. From the selection shown, choose "Other".


2. Enter the required information as you see on your screen and confirm by pressing "Save".


3. Click on "POP". If you have correctly entered your information in the previous screen, all the fields here should already be filled in for you.
Fill in the required fields as you see on the picture below but with your account information. Then click on "Save" to confirm.


4. After a few seconds, if the following screen will pop up. Click on "Yes".


Enjoy using Webmail in your iPhone!

Sunday, May 24, 2015

Paypal Fees (Updated on 25th, May 2015)

Paypal Fees (Updated on 25th, May 2015)

Simple Fees:

When you buy from an overseas seller, there’s a fee for currency conversion. When you sell, there are no monthly or cancellation fees. You only pay a fee after each sale. 

Selling is 4.4% + 2.00 MYR per sale, or lower.

Merchant Fees:

The more you sell, the less you pay. There are no hidden fees. You can accept all major card payments from over 143 million customers worldwide. You don't have to pay anything until you get paid for selling something. International payments cost a little more.

More about merchant fees: